
Introduction
Drawing can be a fun and rewarding hobby, and one of the simplest yet most enjoyable subjects to draw is a cow. Whether you’re a beginner or an experienced artist, creating a cow and its distinctive cow print is a fantastic way to explore your creativity. In this blog, we’ll guide you through the entire process, ensuring that you not only draw a cow but also master the art of drawing cow prints. Let’s get started!
Materials Needed
Before we start drawing, gather all the necessary materials. Here’s a list of essential items you’ll need:
- Paper or Sketchbook
- Choose a good quality paper that can handle erasing and shading. A sketchbook with smooth pages is ideal for drawing cow prints.
- Pencils (HB, 2B, 4B)
- Different pencils offer various shades and depths. HB pencils are great for light sketches, 2B for medium shading, and 4B for darker areas.
- Erasers
- A good eraser is essential. It helps you make corrections and clean up your drawing. Consider using a kneaded eraser for precise erasing.
- Black Marker or Pen
- Use a black marker or pen to outline your drawing. This will add definition and make your cow print stand out.
- Colored Pencils or Markers (Optional)
- You can add color to your cow drawing with colored pencils or markers. This step is optional but can make your drawing more vibrant and engaging.
👉 Click here to visit HeyCowPrint.
How to Draw Cow Print
Cow prints are fun and easy to draw. They add a unique and trendy touch to any artwork. Here’s a detailed guide to help you create your cow print designs.
Draw Random Shapes
- Start by Drawing Irregular, Blob-Like Shapes
- Use a pencil to sketch random shapes on your paper. Think of irregular blobs or puddles. These shapes should look organic and varied. Imagine the natural, uneven shapes you might see on a cow’s hide.
- Experiment with Different Shapes.
- Draw some spots with smooth, rounded edges and others with jagged, uneven lines. This variety will make your cow print look more realistic.
- Use Light Pencil Strokes
- Keep your initial lines light. This allows you to easily erase and adjust the shapes as needed. Light strokes also make it easier to refine the shapes later.
Vary the Size and Shape
- Ensure the Spots Are of Different Sizes and Shapes
- Avoid uniformity. The spots should vary in size and shape to mimic natural cow patterns. Some spots can be large and dominate the area, while others are small and scattered.
- Create a Balanced Mix
- Aim for a balanced mix of large, medium, and small spots. This balance adds to the visual interest and realism of your cow print. Think about how natural patterns have a variety of spot sizes.
- Adjust as Needed
- Don’t hesitate to adjust the sizes and shapes as you go. The goal is to create an organic, random pattern. Keep tweaking until you’re satisfied with the look.
Spacing and Arrangement
- Arrange the Spots Randomly
- Scatter the spots across your paper in a random arrangement. Avoid creating symmetrical or evenly spaced patterns. The more random the placement, the more natural your cow print will look.
- Consider Natural Cow Patterns
- Look at pictures of real cows for inspiration. Notice how the spots are not evenly distributed. They have a natural, uneven distribution. Use this as a guide for your arrangement.
- Leave Some White Space
- Allow for some areas of white space between the spots. This negative space is essential to the cow print pattern. It highlights the spots and adds to the overall visual appeal.
- Avoid Clustering
- Try to avoid clustering too many spots together in one area. Spread them out to maintain a balanced and pleasing look.
Fill with Black
- Use a Black Marker or Pen to Fill in the Shapes
- Once you are satisfied with the arrangement, use a black marker or pen to fill in the shapes completely. Start with the outline and then fill in the inside.
- Outline First, Then Fill
- Outline each shape with your marker or pen first. This helps define the edges clearly. Once the outline is complete, fill in the shapes with solid black.
- Ensure Even Coverage
- Make sure the black ink covers the entire shape evenly. Avoid leaving any gaps or lighter areas. The solid black spots should have a consistent, bold appearance.
- Add Finishing Touches
- After filling in all the spots, review your work. Add any final touches to ensure the spots look polished and complete. You can also clean up any stray marks or lines for a tidy finish.
Drawing cow prints is a delightful process that allows for creativity and experimentation. By following these steps, you can create realistic and visually appealing cow print designs. Remember, the key is to embrace the randomness and natural variation that make cow prints so unique.
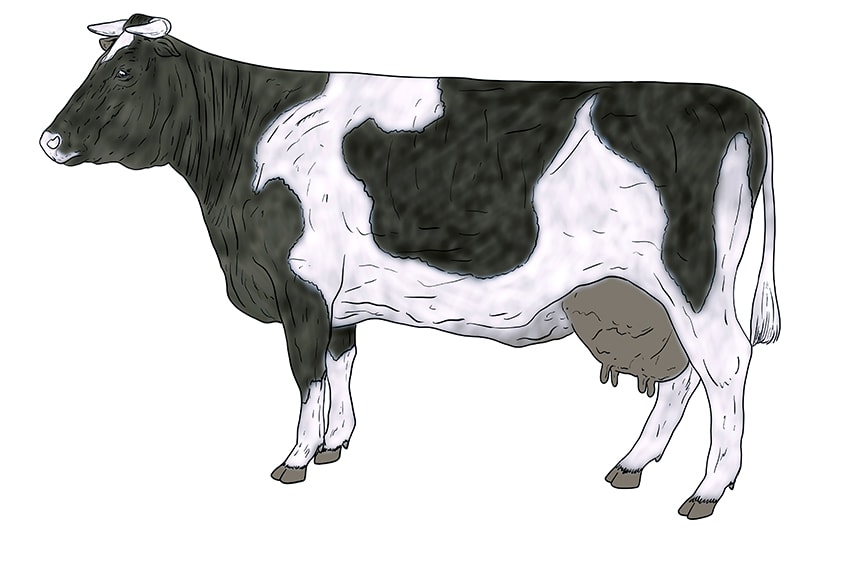
How to Draw a Cow
Drawing a cow can be a fun and engaging activity. By following these steps, you can create a cute and realistic cow drawing that can be the perfect canvas for your cow print designs.
Outline the Body
- Draw a Large Oval for the Body
- Start in the center of your paper. Draw a large oval shape to represent the cow’s body. This oval should be horizontal and occupy a good portion of your drawing area. Keep your lines light and smooth.
- Add a Smaller Oval on Top for the Head
- Above the large oval, draw a smaller oval. This will be the cow’s head. Position it slightly to one side to create a natural look. The smaller oval should be connected to the larger one.
Add the Legs and Tail
- Draw Four Rectangular Shapes for the Legs
- Under the large oval, draw four rectangular shapes for the legs. Place two at the front and two at the back. Make sure they are evenly spaced and proportionate to the body. The front legs should be slightly closer together than the back legs.
- Add Hooves
- At the bottom of each leg, draw a horizontal line to represent the hooves. Add small, rectangular shapes for the hooves, giving the legs a sturdy appearance.
- Draw a Thin, Curved Line for the Tail
- From the rear end of the body, draw a thin, curved line extending outwards for the tail. Add a small tuft at the end of the tail to give it a realistic look. The tail should have a gentle, natural curve.
Draw the Head and Ears
- Sketch the Cow’s Head Shape
- Refine the smaller oval into a more defined head shape. Make the bottom slightly narrower, tapering towards the snout. This will give the cow’s head a more natural look.
- Add Two Large Ears on Each Side of the Head
- Draw two large, rounded ears on either side of the cow’s head. These should be positioned slightly above the horizontal midpoint of the head. Make the ears slightly curved to give them a lifelike appearance.
Features and Details
- Draw the Eyes, Nostrils, and Mouth
- Add two round eyes on the head, near the top. Below the eyes, draw two small ovals for the nostrils. Finally, add a simple curved line for the mouth. Make sure the features are symmetrical and evenly spaced.
- Add Details Such as the Cow’s Udder and Hooves
- Underneath the body, sketch the cow’s udder. It should be a small, rounded shape with a few lines to indicate the teats. For the hooves, draw a horizontal line at the bottom of each leg to separate the hooves from the legs.
- Define the Cow Print Patterns
- Now that your cow’s basic structure is complete, you can add cow print patterns. Draw irregular, blob-like shapes on the body, head, and legs, varying the size and shape of each spot. Use a black marker or pen to fill in these spots, creating the iconic cow print look.
By following these steps, you can create a charming and realistic cow drawing. Adding cow print patterns enhances the drawing and makes it visually appealing and unique. This cow can be the centerpiece of your artwork or a fun project to practice your drawing skills.
Tips and Tricks
Perfecting your cow and cow print drawings can be made easier with these helpful tips:
- Practice Different Spot Shapes and Sizes
- Experiment with various spot shapes and sizes to make your cow print look natural. The more variety, the more realistic your drawing will appear.
- Use Reference Images
- Look at pictures of real cows to guide your spot placement and shapes. This can inspire and improve the accuracy of your drawing.
- Keep Your Hand Steady
- For clean, crisp lines, use smooth, controlled movements when outlining and filling in spots. A steady hand ensures even coverage and precise shapes.
- Work Light to Dark
- Start with light pencil strokes to outline your drawing and spots. This allows for easy corrections. Once satisfied, go over your lines with a marker pen or marker.
- Add Shading and Details
- Enhance your drawing with shading and small details like hooves and udder lines. This adds depth and realism to your cow.
- Experiment with Different Papers
- Try using different types of paper, such as textured or colored paper, to add unique effects to your cow print artwork.
Conclusion:
Drawing a cow and cow print is a fun and creative activity suitable for all ages. With these simple steps and tips, you can create your own unique and charming cow art. Grab your pencils and paper, and start drawing today! Don’t forget to share your creations and inspire others to join in the fun. For more inspiration and cow-themed products, visit HeyCowPrint. Happy drawing!
Keep an eye for more news & updates on VentsFashion.com!